There are a few options available for javascript autocompletion using vim. If you need to work with Flow or Typescript you’ll probably want to set up a solution like deoplete, but that’s not our case right now.
This guide is focused on setting up autocompletion for the basic javascript environments and libraries used nowadays on web development courses and bootcamps. We’re talking about node.js, react.js, underscore.js,the immortal jquery, and browser objects and methods (like the basic console.log() or document.getElementById()).
Let’s accomplish that taking 3 steps:
- Set up the built it omnifunc autocompletion
- Install vim-plug as a plugin manager
- Install and setup tern_for_vim plugin> Let’s do it!
1. Set up omni completion
Open your .vimrc file and add the following lines:

(… and that will be enough to provide you CSS autocompletion too, as written on this post!).
2. Install vim-plug
You can check another fancy alternatives on the installation guide but basically you just need to download the plug.vim file, and place it inside ~/.vim/autocomplete/ folder (create autocomplete/ folder if it doesn’t exists).
3. Install and set up tern_for_vim
- To install tern_for_vim via vim-plug, you must open your
.vimrcfile and add the following lines:

(Thanks Alexander Sullivan, and MisterOccan for the tip ‘do’: ‘install’)
"-- PLUGINS (Using junegunn/vim-plug) --
call plug#begin()
Plug 'ternjs/tern_for_vim', { 'do' : 'npm install' }
call plug#end()
- Restart vim and, in NORMAL mode, type
:PlugInstall. This is a vim-plug command that installs all plugins listed on.vimrcfile. (Check all vim-plug commands here).
- Create the Tern config file on your user directory, the file name must be
~/.tern-project, open it and include the following lines:
{
  "libs": [
    "browser",
    "ecmascript",
    "jquery",
    "react",
    "underscore"
  ],
  "plugins": {
    "node": {},
    "esmodules": {}
  }
}
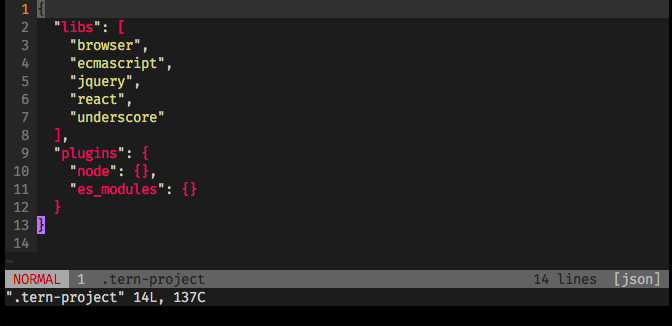
The file has a JSON structure but DON’T include a .json extension!
… And now you’re good to go!
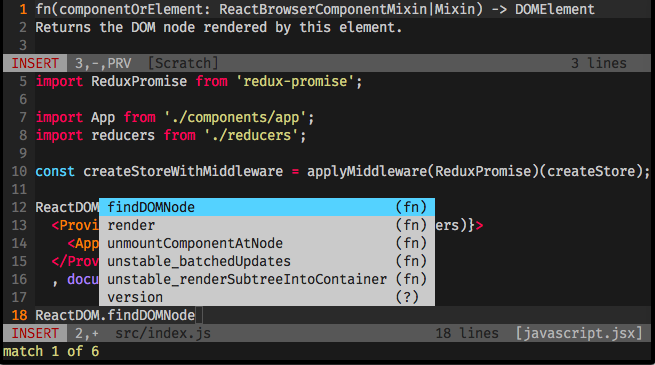
Open any javascript file that you want to work with, start typing the object’s or method’s name and hit <C-x> (Ctrl + x) then <C-o> (Ctrl + o) to show the autocompletion panel.

tern_for_vim show hints on top of your window.
That’s it!
Useful links & references:
- Tern
- tern_for_vim
- omnifunc
- vim-plug
- Vim Documentation (
:help) - “Mastering Vim Quickly” Book (and screencasts) by Jovica Ilic. It’s an awesome book, make sure you subscribe to the newsletter to get free Vim tips and book excerpts on your email.
(👆 This is an affiliate link. If you got any value from this post and are also interested in buying the MVQ book/screencasts, please consider visiting the affiliate link and you’ll be gifting me a coffee ☕ or a beer 🍺.)
Footnotes:
- Follow me on Twitter to get more posts like this and other quick tips in your feed.
- alldrops.info is the TRUE and FOREVER FREE home for the previously used medium.com/vim-drops publication. At alldrops.info you’ll always find all posts without Medium.com restrictions.
- If you have any doubts or tips about this article, I’d appreciate knowing and discussing it via email.
- Do you have any other Vim tips? Would you like to publish that in this blog? Please send an email to vim drops.
- As English is not my native language, I apologize for the errors. Corrections are welcome.
- Contact: vim [@] alldrops [.] info.